Town Car Front Upper and Lower Ball Joints
For some reason everybody seems to think everything should be fucking FREE nowadays.
But it took me a long fucking time to put this together for you guys.
And I would appreciate some kind of donation. SO, send me some bucks at PayPal.
Use this EMail Address: HB ATSIGN LightHouseNova.com
Thanks.
How to replace and perform a replacement of the upper and lower ball joints on a 1995 Lincoln Town Car, without having to use a ball joint press. Complete tutorial with lots of pictures showing removal and installation of both upper and lower ball joints.
I didn't think to take pictures until I was putting it back together, so keep that in mind.
Damn...I had this mostly done, but forgot to save it as I was going along...and then Dreamweaver crashed and I lost it all...........So this is the second version.....crap..
If anybody sees any errors, or has other suggestions, there's a contact link at the bottom.
Read through this whole tutorial before you start, so you'll get an idea of what's involved. It's a whole lot easier than it seems......
Before you start, spray down all the parts that will come apart with a good penetrating oil. This is some of the best stuff I've ever found, but PB Blaster, or Liquid wrench will probably work good. Forget WD40. Then drive around for a day or so, or wait overnight before you start.
Also, buy the best (most expensive) parts you can. NAPA carries good stuff. If you live in the Palm Springs area, talk to George. He has a 92 TC, and knows his stuff. Btw, Never buy any parts from Star autoparts in Indio, Ca. NAPA carries Moog under their own brand name btw. You don't want to be doing this again in a few years, OK? And you might as well do the uppers if you're going to all this trouble, and do the sway bar link while you're at it. Before you decide to do the tie rod end though, make sure it's bad..........cause the new one at NAPA doesn't look as strong as the stock one.......

First jack up the side you're going to do. I like to put a big block of wood behind the wheel well, and that leaves the floor jack free for other tasks.
Take off the wheel, and the brake caliper. I use 5 gallon buckets to set stuff on. Here you see a piece of wood that I also use.
Take your floor jack and put it under the big spring and jack up the A arm a bit.
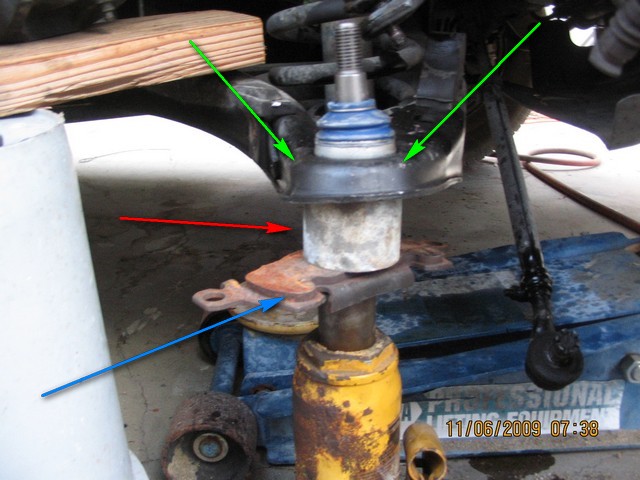
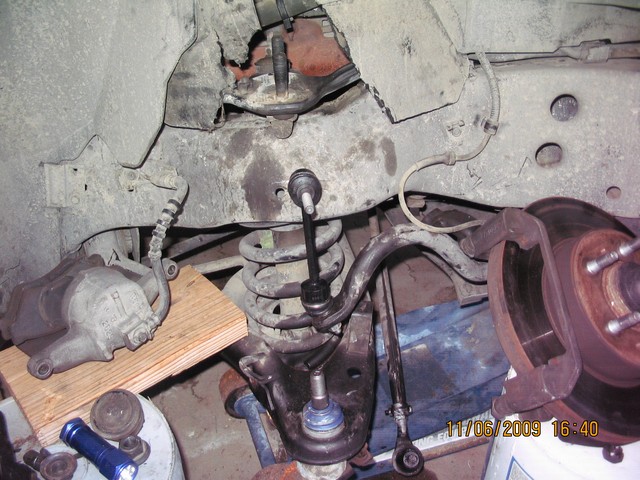
Here's the basic setup:

Next remove the tie rod from the spindle. Take out the cotter pin and remove the nut (Green Arrow). Then take a pickle fork (get a good one from NAPA if you don't have one) and stick it where the red arrow is, and bang the end of it with a hammer until the tie rod pops off. Just let it drop. Remember that these pics are from when I was putting it back together. Now the spindle wil swing back and forth so you can get to stuff easier.:

Next remove the sway bar link nut (Red arrow). You'll need the pickle fork to remove the link....or try to pry it out with the fork, or just bang on the bolt if you're gonna replace the link.
Then remove the big nut of the lower ball joint (Blue Arrow).
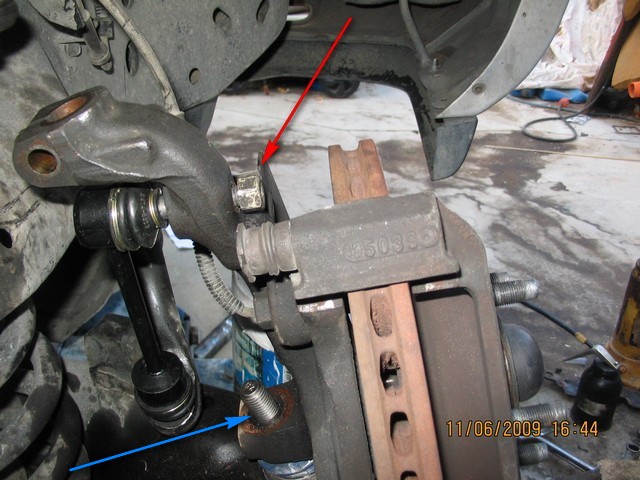
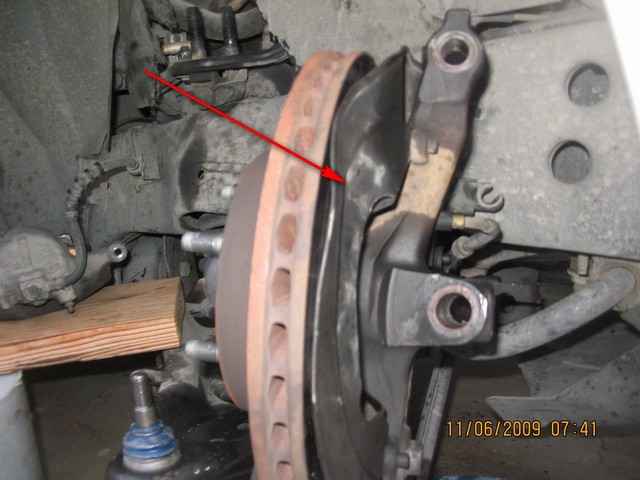
Then take your pickle fork and put it where the red arrow is and beat the living crap out of the end of the fork, to separate the lower ball joint from the spindle. It's already been removed here, but the arrow shows where the fork goes:
Now, you need to mark where the cams of the upper ball joint assembly are, or remember about where they are, or write it down. On mine, the mark on the inner one was where the red circle is, and the outer one was neutral, or straight up. This is so you can get it close when you put it back together. You will want to get a front end alignment right after you're done anyway:

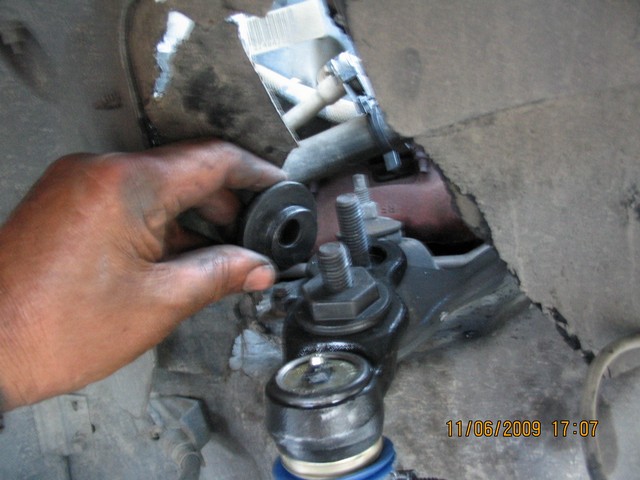
Here's more pics of the what it looks like. Remove the pinch bolt nut (red arrow) before you loosen the top 2 nuts. Make sure you have the jack under the A arm where the big spring is, and that it's jacked up aways. Then the pinch bolt should slide out, or you can use another bolt to drive it out. Don't mess up the threads:

Cams
Here's where my mark was. I scratched it with a sharp knife, but you can't see it in this picture....as long as you get close when you put the new one on, it's good enough.

Now the only thing still attached to the spindle is the speed control sensor wires. I found out afterwards that you can just remove the speed sensor....there's only a bolt holding it in .....and it's a good idea to remove it so you can blow all the crap off it, or wipe it off.
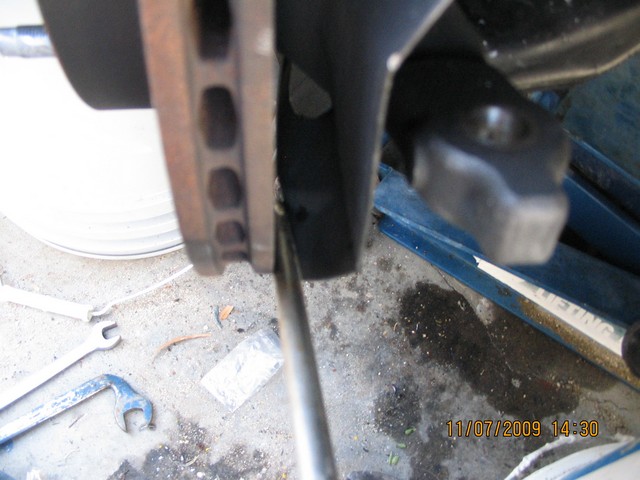
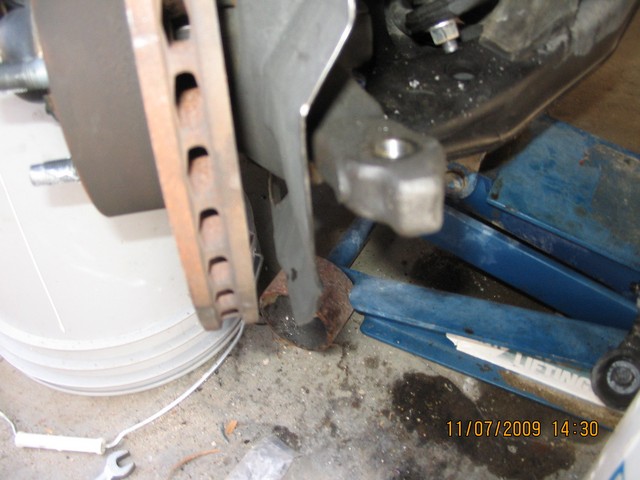
But here's the tricky part. You can't remove the spindle, because the shroud on the back hooks under the end of the A arm. And you can't remove the shroud cause it's riveted to the spindle. SO, you have to bend it in against the rotor. This is a view from the bottom of the spindle:

Once you bend it in, you can remove the spindle.
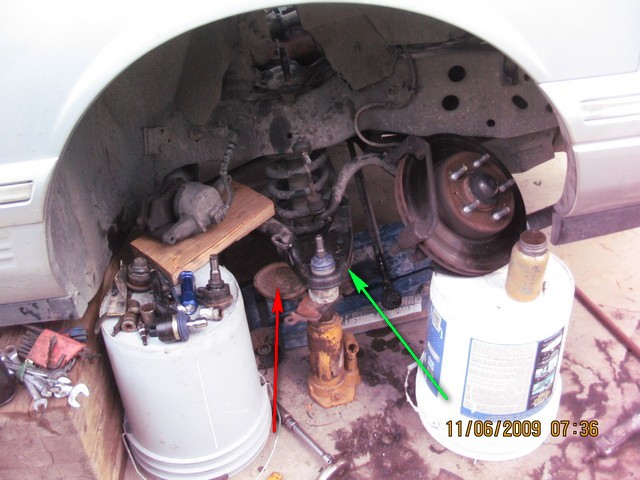
Now it's time to remove the lower ball joint. Here's the basic setup again. This is from when I was putting it together, so IGNORE where the bottle jack is in this pic. Take your bottle jack and put the top of it NEXT to the lower ball joint at the bottom of the A arm....this will help support tha A arm while you are beating it out with your Big hammer.
Make sure the floor jack is under the A arm where the big spring is and have it jacked up. Red arrow shows the end of the floor jack, but in this picture it's not jacked up. The green arrow shows where you want the top of the bottle jack. As close as you can get to the lower ball joint, under the A arm. Do NOT put it under the ball joint, ok?...lol.
Just had a thought. If you can get a short piece of pipe that fits AROUND the lower ball joint, to where it can come out through the pipe, you can use the setup below as is. There's not much room between the ball joint and the end of the control arm, so probably just using the bottle jack close to the ball joint is the only option. Maybe the bottle jack can be placed under the end of the control arm....If you're a pack rat like I am, you may be able to find something that will fit around the ball joint ....maybe part of an old alternator or something.
Then you bang the living beejeesus out of the ball joint with a Big hammer.
The red arrows is about where you bang the living crap out of the ball joint. Hit first one side, and then the other...it will come out......Try to hit on opposite sides of it....those arrows aren't quite right. Once it's almost out you can hit the top of the bolt itself:

Next we're gonna put the new one in. Smear some Anti Seize all around the new one, and put some inside the hole too. You can sand the hole a little bit first with some 220 grit, to get rid of any rust etc.
There should be a hole, or a mark or something on the boot of the new ball joint. Make sure that points in towards the engine, and away from the rotor. The reason for this is that if it overflows while you're greasing it, any grease that comes out of the boot will go away from the rotor......cause grease or oil on a rotor is Bad.
I found out that a short piece of 2" iron pipe will fit pretty good on the lip around the new ball joint. Don't use a pipe nipple, cause it may slip. You need a short piece of 2" pipe that's been cut square.
Jack up the bottle jack until you have good pressure against the ball joint. It should be lifting the car a bit.
Blue arrow shows an old brake pad. Red arrow is the short 2" pipe. The green arrows is where you beat on the A arm to drive the ball joint back in. First one side and then the other. Keep beating until the ball joint seats against the bottom of the A arm:
And here's the setup. Do it this way, with the pipe, so you don't screw up the bottom of the ball joint, where the grease fitting goes.
You're done when there is no more gap here:

Here's a pic on removing the tie rod end, which shows how the lower ball joint should look when it's fully seated. That tie rod end is left hand thread btw. Think twice about replacing it, and measure how many threads are sticking out before you remove it. You can test if it's good by how easily/sloppily it moves. The new ones are different, and you want to get a new one in as close as you can to where the old one was before you get the whole front end realigned. If you replace it, set them side by side, and mark where the old one was. My old one was 5 threads out from the end of the tie rod. The new one was like 20 when I put them side by side.

First hook up the sway bar link to the sway bar if you got a new one.
Now we can set the spindle back in, and reassemble the upper ball joint to the spindle.
Play around with the floor jack raising and lowering the A arm to help get things lined up and back together.
And here's another trick that you'll need: All the new parts come with special lock nuts. If you try to just put say the sway bar link together with those nuts, the little ball joint will just spin. SO, use an OLD nut, and tighten it up to pull the end into where it goes. It will bind up, so then you can undo the old nut, and use the new lock nuts.
I decided to keep my old tie rod end, cause it felt tight still, and I didn't like the looks of the new one, but I screwed up the boot when I was taking it apart. SO, I bought just a new boot, and cut off the old boot. I also drilled a hole for a grease fitting. The boot doesn't fit like the stock one, but it works. (Red arrow below).
Once you get it all back together, bend out the shroud again with a screwdriver.
Screw in your grease fittings, and pump em up until the boots move a little. I used Valvoline Synthetic grease.
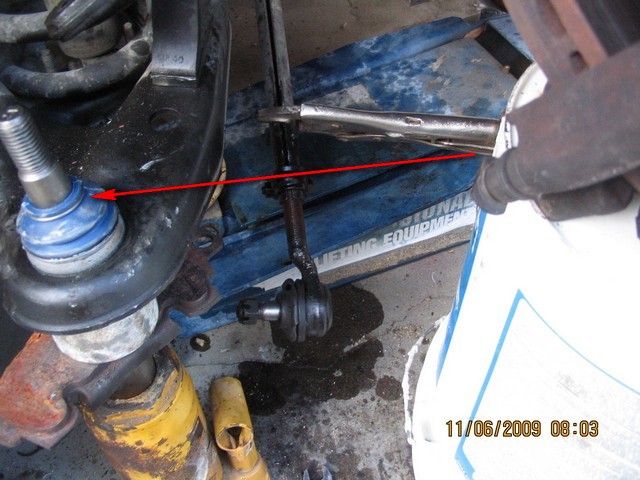
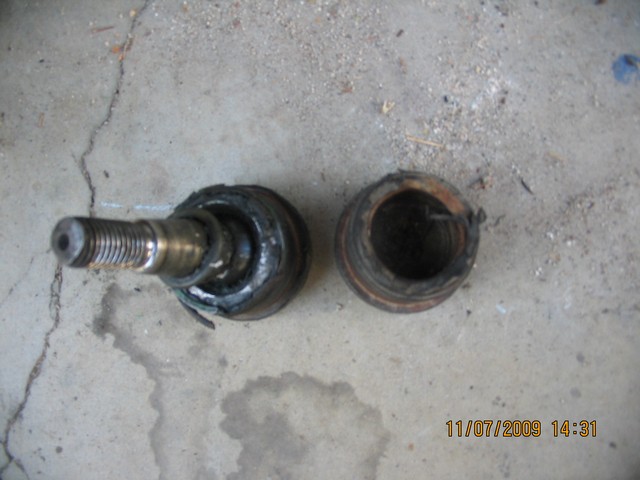
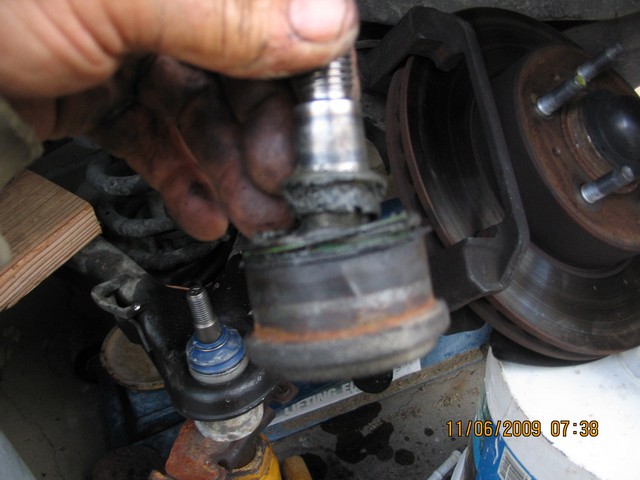
Here's what happens when a lower ball joint goes. It's the one on the right. What happens is your whole A arm winds up on the pavement, with your tire stuck out like some cartoon character's feet. It's not pretty let me tell you:
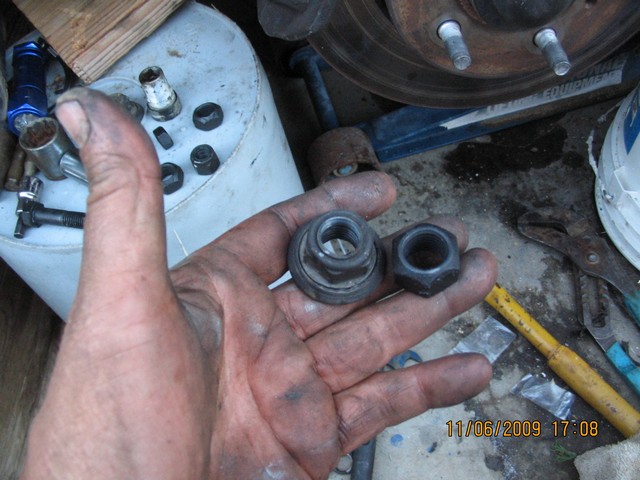
And I decided to reuse my old pinch bolt for the upper ball joint, cause the stock one was nice and square and fit the spindle, so you don't have to back the head up with a wrench. An impressive little piece of engineering from Ford....one of the few and far between imo.

I also decided to reuse the old lower ball joint nut, cause it looked heftier with a better design. I guess I could have used a washer, or lock washer, but wtf:
Misc pictures:
Old lower ball joint:
Close up of lower ball joint setup. Lower ball joint (Green Arrows). 2" pipe (Red arrow).

Shroud bent in good:
Bent out again:
Count the threads sticking out before removing tie rod end:

Using the new lock nut after tightening it with the old nut on the sway bar link:

Old sway bar link:

New sway bar link:
Putting the squeeze on the tie rod, to get it into it's home in the spindle:

Pipe cheater on the vice grips on the tie rod:

Upper ball joint:

Upper ball joint without the cams:

Also your rotor is undoubtedly full of greasy finger marks.......at least mine was. SO use some brake cleaner, or acetone, or gasoline, or starting fluid, and clean that rotor. You can hold a soaked rag against one side and spin it by holding on to a lug bolt.......Make sure your rotor is nice and squeaky clean before you put your brake caliper back on.
A deep a deep............That's all folks.................
PS. On some Town Cars, the upper ball joints are left and right hand. On the 95 they're the same on both sides.......at least the replacements are.
Torque Values (From other tech articles on Lincolns Online )
Brake caliper mounting = 45 - 65 lb/ft(90 – 94)
Brake caliper mounting = 21 – 26 lb/ft (95 on)
Brake caliper anchor = 126 – 168 lb/ft (95 on)
Upper ball joint = 51 – 67 lb/ft
Sway bar end link = 30 – 40 lb/ft
Tie rod end = 35 – 47 lb/ft
Lower ball joint = 80 – 115 lb/ft
Wheels = 90 – 100 lb/ft
Upper Ball Joint:
Pinch bolt torque ......... 51 - 67 lb/ft
Securing nuts .............. 107 - 129 lb/ft
Lug nuts ...................... 90 - 100 lb/ft
With castle nuts tighten to the LOWER torque figure, and then tighten a little more until the cotter pin hole aligns with a slot in the nut.
Check out these associated tech tips:
Sway bar end links: http://www.lincolnsonline.com/tech/00038.html
Upper Ball Joint: http://www.lincolnsonline.com/tech/00112.html
Lower Ball Joint: http://www.lincolnsonline.com/tech/00226.html
Questions/Errors/Suggestions/Tips: Contact